In your web coding assignments, you may be asked to use Github as a version control system for your projects. The instructions below repeats and expands on the information described and demonstrated in class. Before using this, it is assumed that you already have:
- Signed up for web hosting services with Reclaim Hosting ($30/year without domain name is acceptable);
- Signed up for an account on Codeanywhere ($3/month package is acceptable);
- Correctly connected your Codeanywhere account to your Reclaim Hosting; and
- Signed up for a free GitHub account.
These instructions are divided into major sections:
- Introduction to Git and Github
- Terminology
- Using Github to Create a Project Repository
- Using cPanel to Connect Your Repository to Your Web Hosting
- Using Codeanywhere with Github text commands
- Basic Git Commands
- Git Conflicts and Resolution
- Git Resources
Introduction to Git and Github
When working on a coding project alone or on a team, it’s useful to use a version control system (VCS):
- You edit code on your server, then check it into the system after your coding session, which saves every version of every code file.
- If you are on a team: before you start your next coding session, you can check out from the system the latest versions of files that others have updated.
The benefits of a VCS are numerous:
- The system acts as a backup for your code, in case a dog eats your homework.
- The system lets you access older versions of code files and see visually what the changes are between versions. If there is a bug, or new code doesn’t work, it’s easy to see the difference from older code and even roll back to an earlier version.
- The system proves to your instructor that you didn’t wait until the last minute to complete your project. (You didn’t, right?)
- On a team project, different team members can focus on different parts of the code on their own servers, without interfering the work of other coders, and then check code into the system as they go.
- This is especially useful when different aspects of the code are compartmentalized into separate files.
- The system can display a history of work over time across different team members, showing which team members have contributed code, and when.
Popular VCSs include Subversion (SVN), Mercurial, and Git. We will focus on the last one, which is supported by several popular services:
- GitHub
- Bitbucket
- Sourceforge
- Amazon’s AWS CodeCommit
GitHub is one of the most popular code management services online. It hosts nearly 200 million projects, making it possibly the largest source of code on the internet. Since 2018 it has been owned by Microsoft, but the platform is used for open source coding projects by Google, Facebook, Twitter, and many others. Basic services are free.
Terminology
Git manages a coding project in a repository: the entire collection of a project’s code files and their versions stored along an internal timeline.
On a team, each person working on the code is a collaborator. But, if it’s just your own project, then you’re the only coder/collaborator.
Each collaborator copies or clones the main (or “remote”) repository to their own local server to create a “local” repository.
Each collaborator manages files in their local repository, which has its own local timeline separate from the remote “main” repository.
As illustrated at right, within this system coders can…
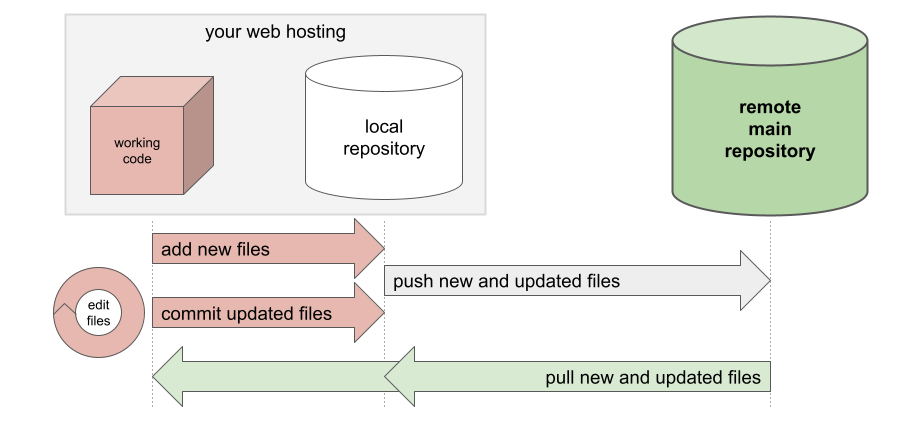
- “Add” new files to the local repository: code, graphics, documentation, etc.
- Edit existing files with Codeanywhere (or another editor), and “commit” those edits to the local repository.
- Update the remote repository with a “push” of files from the local repository to the remote repository.
- Get the latest code from other collaborators with a “pull” of files from the remote repository into the local repository.
Git commands are entered by typing text into your server’s OS command line. Learning the command line is a little like learning a new programming language. Fortunately, there are only a handful of commands you need to use. See the sections on Using Codeanywhere with Github text commands and Basic git Commands for more information.
Using Github to Create a Project Repository
When you start a new coding project, you need to create a new repository.
- Log into your GitHub account.
- Once you are logged into the GitHub main dashboard, click on “Create Repository”. (Or, under the account menu, choose “Your Repositories”, then click on “New”). A form will appear.
- Fill out the form as follows:
- Name the repository. It should be alphanumeric, lowercase, no spaces, although you can use hyphens. Example: for Tiny Projects, use the abbreviation “tp” followed by the project number (e.g. “tp3” for Tiny Project #3).
- Enter a brief description (e.g. “code for Tiny Project #3”).
- Check the box for “Add a README file”.
- Click on “Create Repository”.
- You should now see the repository with the README.md file in the file list.
The contents of README will be displayed below the list. If you want to edit it through GitHub directly:
- Click on the pencil icon. An editable text box will be displayed.
- Edit the text as you wish.
- Scroll down below the text editing window. You should see the section titled “Commit Changes”.
- In the first text box, enter a simple one-line description of your edits — such as “made edit to README”.
- Click on the button “Commit Changes”.
Note that GitHub uses special formatting for the README file.
Using cPanel to Connect Your Repository to Your Web Hosting
Once you have access to a git repository — either by creating it on GitHub, or being added as a collaborator to someone else’s project — you can copy it (or “clone” it) to your “local” repository on your web hosting using the cPanel administrative dashboard.
- Log into your Reclaim web hosting client area.
- In the menu bar, click on “cPanel”. Your web hosting cPanel dashboard should appear with rows of icons organized into sections.
- In the section called “Files”, find the icon labeled “Git Version Control” and click on it. A simple interface will appear.
- Click on the “Create” button. A series of options will appear to clone a repository.
- Enter the requested information:
- The URL of the GitHub repository — copied out of your web browser’s address bar.
- The server directory path to store the files. This should be a directory within your public_html directory if you want to be able to edit the files in Codeanywhere and test the files on your web server.
- In the path name, replace “repositories” with “public_html” if you do not already see “public_html” listed in or before of the path name.
- If your web hosting has multiple domain names, you may have to use a different directory name than “public_html”.
- A local reference name for the project — just a label for you to use in this screen.
- Click on the “Create” button. If everything is correct, the display will return to the Git Version Control page, which will now list your newly-cloned repository.
Check access: Log into Codeanywhere and look for the new repository in the file list. You may have to right-click on your hosting connection name and choose “Refresh” for Codeanywhere to look for new files. If you do not see it, you may not have correctly entered “public_html” step above. In that case, go into cPanel, into Git Version Control, and remove the repository, then redo the steps above.
Check permissions: You may also need to check the server permissions on that folder. In Codeanywhere, right-click on the folder name and choose “Permissions” from the menu that appears. A pop-up window will appear. Whether the pop-up window is empty, or has some other number value, set the value to “755” and click “OK”.
Using Codeanywhere with Github text commands
You issue git commands to the server by typing their text into a command-line interface or a terminal window, and submit them to the server by pressing the Return or Enter key.
To securely access the server’s command line in Codeanywhere, right-click on the repository directory name and choose “Open in Terminal”. A new tab will appear in CodeAnywhere, with a secure SSH command-line to your server. From this point, you type complete commands, then press return and read the results.
If you make a mistake in the command, you can backspace to delete text, or use arrows to go left and right. You cannot use your mouse pointer to click to an earlier point in the command to correct it.
The terminal’s command line remembers all your previously entered commands. You can use the “up” and “down” arrow keys on your keyboard to cycle through old commands and re-use them, or edit them for submitting again. You can also use the tab key to autocomplete file names. And, you can interrupt or cancel an existing Git command by pressing Control-C on your keyboard.
If you don’t use the terminal tab for awhile, it may time out. Just close that tab in Codeanywhere and reopen it.
Think of your coding work in terms of “sessions”: you sit down at your computer to spend a certain amount of time, or accomplish a specific task. Start your session by opening Codeanywhere, right-clicking on the repository folder, and choosing “Open in Terminal”. This will open a secure command line (or “terminal window”) to your server. You can leave this tab open while you work on other files.
Basic git Commands
All Git commands are typed with the word “git” followed by a specific instruction and options, and ending by pressing the Return or Enter key. The precise spelling, spacing, and case of the text is important.
For example, you could type this command…
git commit -m "fixed error in css" filename.css
…has these components:
- git — tells the server this is will be a git command
- commit — tells git to save your latest file edits to the local repository (other git commands include add, push, pull, etc.)
- -m — an option that includes a description of what is getting committed (other options can be used, if you know them)
- “fixed error in css” — a description of what you’re committing, as a note to yourself or your instructor (don’t forget the quotes)
- filename.css — the file you are committing (you can have multiple files listed here, separated by spaces; see below)
The basic git commands are:
- add files to your local repository, to mark them as project files
- commit edited or newly-added files to your local repository, essentially marking a version in the timeline
- push locally-committed files to the remote server repository on GitHub
- Repeat the commit and push commands whenever you edit your code
Then, if you or someone else makes changes to the remote Github repository outside of your own server, you can pull remotely-committed files from the server into your local repository. This is useful if you have made an edit directly through Github’s web interface, or if you are working on a shared repository with other people. They can push code into the repository for you to pull to your server and work on.
Keep reading for details on the initial setup and on using the add, commit, push, and pull commands (and more).
Git Basics: Initial Setup
The first time you use Git in the terminal window, you need to enter some commands to configure it. You can copy and paste these into the terminal window, updating them as described below. Make sure you press the Return or Enter key after each command.
To tell Git the email address you used on Github, replace the text in these quotation marks with your email address:
git config --global user.email "[email protected]"
To tell Git your name, replace the text in these quotation marks with your name:
git config --global user.name "Your Name"
By default, Git asks for your GitHub username and password with every push and pull command. To have Git remember your username/password, enter this command:
git config --global credential.helper store
Git Basics: Add
You have to add files to the repository to mark it as a project file, before you can commit or push them. Files can be added one at a time, or as a list of names separated by spaces, or all together.
Add a new file to the local repository:
git add filename.php
Add a series of new files to the local repository:
git add filename1.php filename2.php filename3.css
Add all local files (and all local folders with their files) to the local repository:
git add .
Git Basics: Commit
Once you’ve added and/or edited files, you commit them to the local repository to save their version on the internal timeline. If you’re into video games, this is like a “save point” for your files.
Commit one edited file to the local git repository with a message:
git commit -m "message" filename.php
Commit a series of files to the local git repository with a message:
git commit -m "message" filename1.php filename2.php filename3.css
Commit all updated files to the local git repository with a message:
git commit -am "message"
Git Basics: Push and Pull
Once you have committed files, you can push them to the remote repository. You can also pull down new files edited by your collaborators.
Important: when you use git push or pull for the first time…
You may get an error that begins with “Please tell me who you are”. If so, make sure you go through the Initial Setup commands listed above.
You may be asked to log in with a username and password. Use your login information for Github. Note that you will not see your password when you type it into the terminal window.
Push the latest commits from local repository to the remote main repository (on GitHub):
git push
Copy down new and updated files from the remote repository into the local repository:
git pull
Note: git pull may sometimes ask you for a “merge” message and open a cryptic-looking text editor. For now, type “:quit” — exactly, including the colon — and continue.
Git Basics: Other Commands
There are several other commands that may be useful.
Check the current directory for files and whether they have been committed yet:
git status
Throw out all your latest commits that have not been pushed to the server:
git reset --hard HEAD
These 3 commands, together in this sequence, resets your local repository so it exactly matches the remote repository:
git fetch origin
git reset --hard origin/master
git clean -fdx
As noted above under “Initial Setup”: by default, Git asks for your GitHub username and password with every command. To have your server’s git remember your username/password, enter this command before your next git command:
git config --global credential.helper store
You will still be asked for the username and password the next time you use git, but not afterwards; it will remember your login info.
Git Basics: Recommended Individual Workflow
If you are working alone on your project, you should regularly save your code, then add and/or commit during each coding session as you go. Then, end the coding session with a push to the remote repository for backup and version control.
git add .
git commit -am "message about what was updated"
git push
Git Conflicts and Resolution
Sometimes, git pull will notify you that there is a conflict between one or more lines of code in a file on your local repository versus the remote repository. For example, here is a merge conflict error for a file called “filename.php”:
CONFLICT (content): Merge conflict in filename.php
Automatic merge failed; fix conflicts and then commit the result.
Git will then update the code in the conflicted file, marking the lines of text that are in conflict. If you already have the file open in CodeAnywhere, close it. Then open it and look for code marked like this, which will show the local and remote versions of the line(s) in conflict. For example, here is an HTML paragraph tag that has two different versions.
<<<<<<< HEAD

<p class="olderClass">This is my paragraph.</p>

=======

<p class="newerClass">This is my updated paragraph.</p>

>>>>>>> c1a2969021f35495951e911cf70ac2bff4ae1e26
Using Codeanywhere (or another editor), update your code to resolve the conflict, whether you preserve your local code, adopt the remote code, or write some hybrid between the two. Don’t forget to delete the lines containing the git markers: <<<, ===, and >>>.
Following the example above, the final edited result might be:
<p class="newerClass">This is my final combined paragraph.</p>
Save the file, then add it again, commit, and push:
git add filename.php
git commit -am "updated the paragraph and resolved conflict"
git push
If you try to git push files from the local repository to the remote repository, but newer code exists on the remote repository from another user, it will be rejected with an error like this:
error: failed to push some refs to 'https://github.com/username/repositoryname'
hint: Updates were rejected because the remote contains work that you do
hint: not have locally. This is usually caused by another repository pushing
hint: to the same ref. You may want to first integrate the remote changes
hint: (e.g., 'git pull ...') before pushing again.
This means you need to git pull the latest code, then resolve any conflicts, then try git push again.
Git Resources
There are several useful git guides and resources on the internet. A few are listed below.
- Official Git resources:
- Community-supported Git reference and training
- FreeCodeCamp has several courses tagged #git, such as a Github Crash Course
- Codecademy’s Learn Git (not free)
- Atlassian Bitbucket (rival to Github) intro to Git